Saturday, November 7, 2015

Buffalo Chicken Salad Crostinis


I'm busy these days... too busy. 
It's been awhile since I had a post-- you've missed me haven't you?

This is what I'd like to call a Hubby-post. Well it's still me writing, but my husband concocted this recipe! 

This isn't a formal recipe, because we couldn't tell you the exact measurements... I'm a southern cook, a lot of eye-balling goes on in my house :) 


First, make your crostinis. You need a french loaf cut in one inch slices, butter or spray them with a olive oil spray. Bake them at 400* until the are slightly toasted on top. 

Meanwhile, mix up the chicken salad. 

So then I, I mean my husband, shredded some leftover rotisserie chicken to which he added ranch dressing (don't let it go swimming), some Texas Pete hot sauce (however much you can handle), a few sliced green onions, and fresh ground pepper. Give it a mix. DONE!

Assembly time! Just take a crostini and put a piece of spring mix lettuce on it, add chicken salad, and one half of a cherry tomato. 

That's it... yep..  you are done.  

Just make and eat away! 

They are delicious. I promise you will love them. 


Thanks for stopping by! 
Mrs Crafty Cook

Monday, August 31, 2015

EASY Chocolate coating for popsicles

Hello All, 
I'm making a quick post because I have to be in "virtual" class in a few minutes... WHATTT?? Where has technology taken us these days? I just started graduate school and all my classwork is online. It's definitely new and uncharted territory, but hopefully it works out ok! :) 

Summer is coming to a close. Today, in my opinion, is the last day of summer. It also happens to be my birthday AND labor day weekend is coming up. All wonderful things to ring in fall. 

But before I go and put up all my fall decorations (literally the only holiday I've decorated for since owning a home) I have to get in this last summer post. 

Popsicles are so summer aren't they? They're cold and just ward off the summer heat like a nice cold glass of tea. I love them. 

I bought some coconut popsicles at Aldi awhile back and while they were good they needed some "amp-age." Nothing plain really suits me, no these pops needed some chocolate. 

When I was a kid I used to love that weird hard shell stuff you could buy at the grocery store. Sometimes I would just eat right out of the squeeze bottle, yeah I was weird. I always wondered if you could make it at home. Well, folks you can! And it's SO good!! 


They were so good and the possibilities are endless!


Good to the last lick! 

Tuesday, July 28, 2015

Easy Chocolate Whipped Cream


An easy chocolate dessert, that will impress your guests! 


Homemade whipped cream is a must with certain desserts: strawberry shortcake, any flavor pie, sweet waffles/pancakes, cobblers, well the list goes on and on. But whipped cream is not just an accessory to a another dessert. In my opinion whipped cream is dessert enough on it's own! Especially when you add in CHOCOLATE
This whipped cream is a lot like a moose, without all the work!


I made two different desserts with the whipped cream, but honestly the possibilities are endless! Take this recipe and run with it! There's so much you can do. 


CHOCOLATE WHIPPED CREAM

Ingredients:
1 pint heavy whipping cream
 3-4 tbsp powdered sugar (adjust to taste)
½ tbsp vanilla extract
Pinch of salt
1 tbsp Hershey’s special dark cocoa powder
~~~~~~~~~~~~~~~~~~~~~~~~~~~~~~~~~~~
½ cup raspberries, rinsed/dried
2  tbsp mini chocolate chips (1 tbsp per serving)
Chocolate sauce (for garnish)

Directions:

·         If using a stand mixer put bowl and whisk attachment in freezer for as little as 10 minutes. Very cold ingredients and tools help stiffen and stabilize the whipped cream and it’s worth taking the extra time to do this step!
·         Add whipping cream to the bowl and whisk on a high setting until soft peaks form. At this point I add in the remaining ingredients (with exception of cocoa powder) and whisk again until it’s stiffened up a bit. Taste the whipped cream. If it’s not sweet enough for your tastes add in a little more sugar until you are happy with the sweetness. I prefer not so sweet.
·         Once you are happy with the sweetness, add in the cocoa powder and whisk on a low setting, or fold into cream.
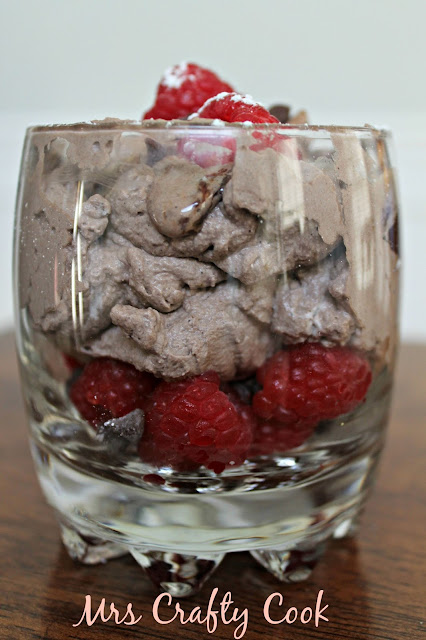
·         For the dessert take a few of the raspberries and 1 tbsp chocolate chips and place in the bottom of a small glass cup. Add a good amount of chocolate whipped cream to the cup. If desired garnish with chocolate sauce, extra raspberries and chocolate chips, and powdered sugar.
·         This dessert is easy, impressive, and delicious! Enjoy!


This dessert would be great to make for company, or to take to a party. Just layer it in clear party cups!


My puppy, Brie, was very jealous she couldn't have any! Poor girl! 

That's not all folks! Here's the second dessert you can create with this delicious whipped cream!

COFFEE INFUSED SPONGE CAKE CHOCOLATE TRIFLE


This is another quick dessert you can make that utilizes the chocolate whipped cream and you just have to try it!


You mix up a quick coffee/espresso sauce to pour over the sponge cake. I love these little sponge cakes. I honestly always forget about them until I go to the grocery store and see them eyeing me as I pick out strawberries. "Oh yeah," I think, "Those make pretty great strawberry shortcakes... but ah... better not." Sometimes I give in to the little voice, and I'm always glad when I do. 


Then just layer it with the chocolate whip! I did two layers and topped it with regular whipped cream (the canned stuff) and a strawberry! This was delicious! Almost like a tiramisu knock-off dessert. 


Hope you will try and enjoy this lovely dessert!
Thanks for stopping by! 
Mrs Crafty Cook


Friday, July 3, 2015

Bacon-Wrapped Asparagus


A yummy delicious side item perfect for your next grill out!


Asparagus is such a lovely vegetable, lately I make it all the time. I saute it for stir-fry, salads, even quesadillas! It's wonderful roasted and served along side an entree. But you know what takes asparagus over the top? Wrapping it in bacon... and grilling it. Oh me on my. Leave the steaks behind, because THIS is what I'm eating. 


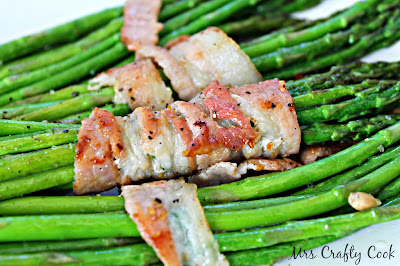
Super easy stuff here. Take your asparagus and cut off the tough ends. Take small bundles and wrap a piece of bacon around and around until it's nice and snug. I actually cut my bacon in half long-ways, but hey the more bacon the merrier right? Make sure you take a tooth pick and secure the bacon to the asparagus. This step completely slipped my mind and you will see why it's important later. 


Once that's done I put the bundles on a piece of foil and took it straight out to the grill. I did spray my foil with a non-stick spray... although I'm sure you could certainly get away with not spraying, because the bacon grease cooks out of the bacon and will stay on the foil. I kept the asparagus on the foil while cooking because things seem to have a way of falling through the grill rack... and I can't bear with losing any of this deliciousness. 


A few minutes on the grill and you're done! Just cook the bundles until the bacon starts to crisp up. When they're done hit them with some lemon juice! It brightens the asparagus and cuts through some of the saltiness of the bacon, and it brings out all the other flavors. YUM!!! Crack some salt and pepper over them and you're done! YAY because I'm hungry. 


Now remember what I said about the toothpicks? Well this is what happens when you neglect to secure the bacon. I mean... duh Kaylee. Bacon shrivels up as it cooks so it only makes sense that it completely fell off most of my bundles. Except the one! Thanks lil' buddy. Just make sure you secure your bacon. Trust me, it's edible and delicious either way... but much prettier and easier to eat when it stays. 


Need some help figuring out what to serve your bacon wrapped asparagus with? Well here's a MEAL IDEA for ya!
We had steaks (my first filet mignon actually!) Slow Cooker Cheesy Potatoes, and the bacon-wrapped asparagus. It was so so so so yummy.


Thanks for stopping by!
Mrs. Crafty Cook

Think you'll like this recipe? Try it along side these Slow Cooker Cheesy Potatoes!


Slow Cooker Cheesy Potatoes-- Pintrest Review


Simple, easy, yummy, cheesy! These are all words that describe this slow cooker potato dish. It will go perfectly with your next meal! Make them ahead and freeze them for cheesy potatoes anytime!!


I found this recipe for Slow Cooker Cheesy Potatoes on Pintrest. It was posted by Six Sisters Stuff. They have an awesome website, I love all the recipes they have. Since this is their original recipe I'm not posting a recipe of my own for this, but rather a review. 


First of all I doubled the recipe. My idea was to make a couple to put away in the freezer and make later. In one batch I used frozen potatoes and in the other I used fresh potatoes that I diced. 


After you mix up one batch put it in a labeled gallon size freezer bag, push out all the air, and store flat in the freezer. When you're ready to make, thaw them in the refrigerator the night before. The day you cook them pour the contents of the bag into a greased crock pot and cook on low for 8 hours. 


These are yummy and cheesy potatoes! I give them 4 out of 5 stars! It's a great recipe because it's super easy and it takes good! The only reason it doesn't get 5 stars is I felt that maybe it lacked a little seasoning (nothing some salt and pepper added at the end won't fix). Also the potatoes seemed somewhat more "mushy" than I was hoping. That aside, my husband loved them and said the recipe was a keeper. 


I garnished the potatoes with some green onion and a little extra cheddar cheese. YUM!! You know what would make it even better? Some crumbled bacon bits right on top! 


Thanks for stopping by! 
Mrs Crafty Cook


Think you might like this? Try my recipe for Grilled Bacon-Wrapped Asparagus to pair along side your potatoes. 


Tuesday, June 30, 2015

Double-Berry Nut Pancakes


These sweet and tart pancakes will make your taste buds happy any day of the week! 


A couple weeks ago my husband and I got to go blueberry picking at a church friend's house. He has 16 (I think) blueberry bushes. The set up is lovely. The bushes are in an enclosed space, to keep the majority of the critters away, and they are tended to everyday! There were big bushes, small bushes, and every size in between. AND THE BERRIES. Oh me! I had no idea there were so many differences in berries! Some bushes produce plump, juicy, sweet berries... while others produce a smaller tart berry. Picking is so pleasant. Just barely rolling a berry between your fingers is about all you have to do to get them off the branches. 
A huge difference from the wild blackberry bushes in my yard. Ouch the thorns!! 


So when it was all said and done we probably had over a gallon of berries from an hour and a half of picking. 
We froze 3 bags worth of berries, PLUS had a huge glass bowl worth of berries. Now... what to do... what to do... 

PANCAKESSSSSSSSSSSSS!!!
Yes. Oh yes. 


Who doesn't love these flat little cakes? I know I sure do. But I'm always searching for more with pancakes. I get bored easily with food. I can't just have a plain pancake with syrup. Nope. Gotta have chocolate chips, toasted sweet pecan syrup, homemade whipped cream, nothing plain or "boring." 
So when I have fresh blueberries, you know I'm going to step-up my pancake game. 


Remember the wild blackberries I mentioned... yeah gonna throw those in here too. And how about some almonds for crunch? Yeah, yeah... Hummm we could throw some homemade whipped cream on top to be even more crazy... Yep. Let's DO THIS!! 


Ingredients:

·         1 cup Bisquick (or make a homemade base)
·         1 egg
·         ½ cup almond milk (or whatever you have)
·         ½ tsp baking powder
·         Cinnamon to taste (I like a lot!)
·         ¼ sliced almonds, and more to garnish
·         ½ cup blueberries
·         ¼ cup blackberries
·         Toppings: whipped cream, syrup, butter, powdered sugar, etc. 

Directions:

Measure out Bisquick into a large mixing bowl. Mix in next four ingredients (egg, almond milk, baking powder, and cinnamon) and mix until combined. If it’s not coming together add in more almond milk until it reaches a pourable consistency. Fold in sliced almonds.

On med-high heat butter a large skillet or griddle, pour about ¼ cup batter onto griddle for small pancakes. Place your berries on top while the bottom side is cooking. When bubbles start forming at the edges, carefully flip your pancake over. If it doesn’t move easily under your spatula wait a little while longer until it does. Cook on the other side until done.

I place my pancakes in a toaster oven (set to warm) while I finish using the remaining batter.

Plate pancakes and top with your favorite toppings. Whipped cream with extra berries and nuts makes an amazing topping. 


Since my husband and I couldn't consume all these pancakes on our own, we froze the leftovers. When you are ready to eat, warm them in a microwave or toaster. They are still yummy, delicious, and perfect for a quick breakfast :) 


Enjoy!!! These are so delicious!
Thanks for stopping by, 
Mrs Crafty Cook

Thursday, June 18, 2015

Summer Squash and Zucchini


So many things remind me of summer. A cool crisp watermelon, homemade ice cream, grilled burgers and corn, sprinklers, water balloon fights, smores, fresh garden tomatoes, and squash & zucchini!! Is that just me? 
I don't know what it is but I just crave yellow squash and zucchini in the summer. Thank goodness because it just so happens to be in season, there's an abundance, AND it's quite a bit cheaper. 


This recipe is SO easy and it's ready in a snap. It's full of flavor and a little bit of cheese really makes the dish complete. 

Try it and I know it will become one of your summer faves!


This recipe makes two - four servings (we eat a lot so it tends to be the lower end), add more squash and zucchini if you are making this for more people or really hungry people.

Ingredients:
·     1 yellow squash
·     1 zucchini
·     ¼ c. onion, chopped
·    1 tbsp olive oil
·     ¼ c. cheese
·     Salt and pepper to taste
Garlic powder to taste

Directions:
1.   Cut the ends off the squash and zucchini. Cut down the middle, then  small slices about ¼”.
2.  Heat olive oil in a skillet on medium high heat. When ready, sauté onion until it starts to become translucent, 3-4 minutes.
3.   Add chopped squash and zucchini and sauté a few minutes. You will want to warm it through, but don’t overcook as it will get mushy.
4.   Season with salt, pepper, and garlic powder.
5.   Add cheese before serving. 


MEAL IDEA: I served the squash and zucchini with meatball subs. It was the perfect pairing. YUM!

Thanks for stopping by!!
Mrs Crafty Cook


Tuesday, June 16, 2015

Leftover Chicken Taquitos


Leftovers are a staple at my house. With only two people eating the meals I make, it seems almost impossible to avoid them. 
But I'm not complaining... oh no. I love leftovers. I cook once and have meal, after meal, after meal at my disposal. Like right now I've got ham and potato soup for the rest of the week, ready for my lunching needs. 


However, I will admit... leftovers can get boring. Sometimes they get better with time, letting flavors meld together and get more sensational... but even with that a girl gets bored! You need some variety, you need some fun, you NEED some taquitos! 

I used the spicy honey chicken recipe (find that here) and a few other ingredients to create these crunchy, slightly spicy and yummy taquitos. 


Ingredients:
·         1-2 spicy honey chicken thighs, shredded
·         ¼ cup cheese
·         Small whole wheat flour tortillas (however many you need)
·         Condiments: (basically whatever you like)
·         Sour cream
·         Diced tomatoes
·         Sliced avocado
·         Shredded lettuce

Directions:
Super easy stuff here. Basically just shred the spicy chicken thighs and warm them in a skillet for a couple minutes. Add chicken to separate bowl and mix in the cheese. There is no need for other spices because the chicken itself is flavorful enough. Put 2-3 tablespoons  of the chicken in the middle of a tortilla and roll it up. Spray the skillet with non-stick spray and place the seam side of the tortilla down first. Warm on all sides until it’s nice and crispy! Serve with your favorite Mexican condiments!


To complete the meal we served it with spanish rice. Ohhhh these were so good... PLEASE give them a try. 

Thanks for stopping by!
Mrs Crafty Cook


Spicy Honey Chicken


Who doesn’t love the sweet and spicy combo? If you like a sweet heat then this recipe is for you!
This chicken is coated in spices and then basted while cooking with honey and vinegar. My husband in particular loves these spices. We’ve not only used them on chicken, but similar spices go great on pork tenderloin, pork chops, and burgers. It has a very distinct flavor, it’s not inherently Mexican, but the flavors definitely pair well with that type of cuisine. 


First you want to mix up all the spices and set aside (smoked paprika, garlic powder, salt, cracked pepper, red pepper flakes, and ancho chili powder). Then you mix up the honey and vinegar and set aside. 


Take your boneless skinless chicken thighs and un-tuck them so they lay flat, and cover both sides in the spice mixture. Set them flat on a sheet pan and cook chicken under broiler. Cook about 5 minutes and flip, cook again 5 minutes and flip again then baste with the honey/vinegar mix. Cook a few more minutes or until cooked through (it will depend how hot your oven is… I don’t usually turn mine on any higher than 450F so it took me a bit longer. Use your meat thermometer and get that chicken to 165F!)


Take it out of the oven once it’s cooked and let rest for a few minutes. 


Meal Idea! Serve this with a cool cucumber and tomato salad, and steamed carrots. They both pair well with the bold flavors from the chicken. 


My husband and I are just a family of two so we generally always have leftovers no matter what I make for dinner. We are completely fine with this fact, but… sometimes you just want to jazz things up a bit. We used this spicy honey chicken to make some AWESOME and EASY chicken taquitos!!! Give them a try if you have any leftover chicken!

Also I used this chicken to make a spicy chicken salad! Just place the shredded chicken over salad greens and add cheese, tomatoes, avocado, whatever you like on salad. It’s so flavorful, you really don’t need dressing. 


Thanks for stopping by
Mrs Crafty Cook